Some caveats. Out of the box, AWS serverless hosting is meant for simple websites with files that all public. Neither S3 buckets nor CloudFront process .htaccess website customisation such as rewrite rules or authentication. CloudFront functions or Lambda@Edge can provide similar functionality - I will post more details once I have figured out the details.
Setting up an S3 bucket is straightforward once you have an AWS account and decide on the AWS region where you want to host the bucket. I starting AWS hosting in the us-east-1 region since that seemed the closest region to most of my website users, but with the introduction of Content Delivery Networks like CloudFront or Cloudflare, this factor is probably less critical. Once you select a region, check that any future AWS serverless configuration is done in that region (upper right beside your account information). Periodically, I end up in the wrong AWS Region which can cause odd issues.
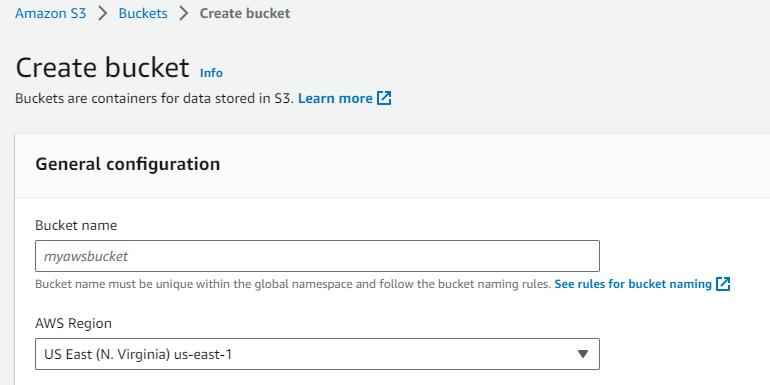
Selecting the S3 service on AWS provides an Account Snapshot and a list of existing buckets. Click on Create bucket. The first task is selecting a bucket name. There is a long list of bucket name rules, the most important is that it must be unique. Since the bucket will be used for a static website, the name can match the final (sub)domain, making it easier to remember. The only access will be via CloudFront and possibly the AWS Command Line Interface (CLI) do NOT uncheck Block all public access. The only default setting I changed was enabling Bucket Versioning to allow quick recovery from fumble fingers.
Clicking on your bucket name in the list provides access to Objects, Properties, Permissions, Metrics, Management, and Access Points.
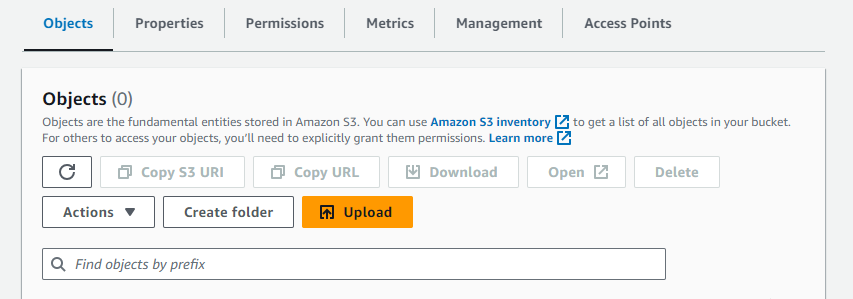
The Objects tab allows you to create folders and upload files via the AWS Console. The Upload button is self-explanatory - you can select the local root files/folders and drag/drop. The GUI shows the files that will be uploaded but does not initiate the upload until you click on the Upload button on the bottom right of the page. The Properties tab lets you modify the S3 bucket settings, the Permissions tab lets you define who has access to the bucket (for the moment, only the bucket owner), Metrics lets you monitor bucket usage (not real-time), and the other tabs are for another day.
If you want to set up CloudFront logging of website accesses, now is a good time to create an S3 bucket for logs. I initially appended .log to the website S3 bucket name but ended up accidentally selecting the website S3 bucket later during log setup. I am now using log. followed by a word or two from the website bucket. I did not enable versioning - I plan to download the log files to a local drive.
Blog comments