Configuring AWS CloudFront is complicated. I find it useful to create a 'cheatsheet' of the steps and key values that I need to complete the configuration. As an example, assume I am transferring an existing https://subdomain.example.ca site to AWS serverless. Ultimately, I will be pointing subdomain.example.com to the AWS serverless instance, but I may want to initially test with something like https://s3subdomain.example.ca (I use Cloudflare that only fully supports first level subdomains, so https://s3.subdomain.example.ca would not work). CloudFront needs to be configured with all (sub)domains and they are also required during creation of the SSL certificate in AWS Certificate Manager. Any mismatches will cause "AccessDenied" errors. It is not possible to add additional (sub)domains to an AWS SSL certificate - the old certificate needs to be removed from CloudFront, a new certificate created, and the new certificate associated with the CloudFront distribution.
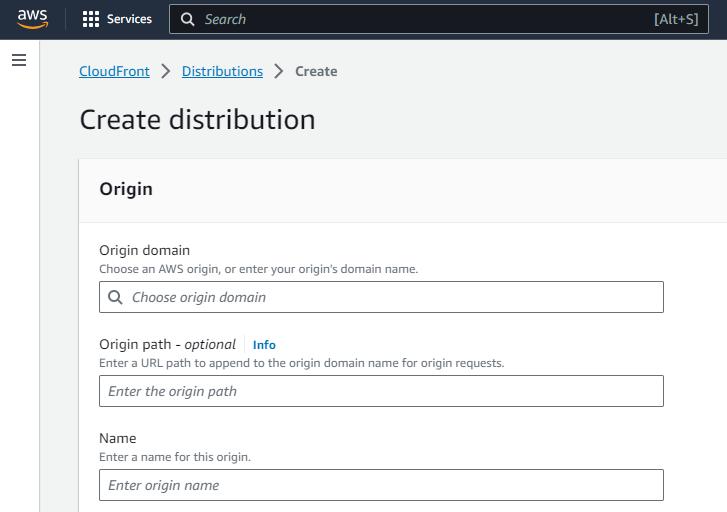
Once in the AWS CloudFront service, start the process by clicking on Create distribution. In the Origin section under Origin domain, choose the S3 bucket that contains the content for this distribution endpoint. The default settings for the other options are fine. In the Default cache behavior section, set the Viewer protocol policy to Redirect HTTP to HTTPS. Leave the Web Application Firewall (WAF) disabled - although the usage charges are minimum, there is a monthly charge just for enabling it.
In the Settings section, enter in all the (sub)domains discussed above in Alternate domain name (CNAME), then click on Request certificate below the selection box. This will take you to the AWS Certificate Manager. You will be configuring a public certificate (the default). Enter in your primary (sub)domain and add any alternate (sub)domains, matching what you entered in the CloudFront configuration. I used DNS validation since I can easily update my DNS information. After clicking on the Request button, AWS Credentials Manager displays a list of existing SSL certificates. Near the top of the screen is a banner for the new SSL certificate - click on View certificate to display the new certificate, a CNAME name/value for each (sub)domain, and a Pending validation status. Head over to your DNS provider and create CNAME records for each pair to verify that you have authority over the (sub)domains. Refresh the screen periodically until the certificate is issued.
Back at CloudFront, refresh the SSL certificates under Custom SSL certificate and select your new certificate. Under Default root object, you can specify what to load if no specific html page is specified (probably index.html). Enable Standard logging and select the S3 bucket you created earlier - I have not figured out what Cookie logging adds. Finally, click on the Create distribution button. Note the name of the distribution and its endpoint (random alphanumerics ending in .cloudfront.net). Once deployment is complete, enter the distribution endpoint into a browser, your static website should appear. If you get "AccessDenied", double-check your Default root object - try loading a specific website component by adding it to the end of the distribution endpoint URL.
You can tighten up security by limiting access to your S3 bucket. Go back to the CloudFront distributions and click on your distribution. On the Origins tab, click on the radio button beside your origin name and then the Edit button. Find the Origin access section and change it to Origin access control settings (recommended). Click on Create control settings and accept all defaults. You will be directed to update the permissions policy on your source S3 bucket. Click on Copy policy and the Go to S3 bucket permissions link that takes you to your S3 bucket's Permissions. Scroll down to Bucket policy - click on the Add new statement button on the right side, delete the policy template, paste the copied policy, and click on Save changes. Back in CloudFront, scroll down and click on Save changes. I am seeing the following pop-up and have not had a chance to investigate.

Test that you can can still access your distribution endpoint via a browser.
The last step is linking a meaningful URL (initially your test URL) to your distribution endpoint. Head over to your DNS provider and created a CNAME record with the Name being the URL (without the https://) and the Value being your distribution endpoint (again without the https://). Save your changes. Depending on your DNS provider, it can take up to 24 hours before the DNS change is replicated. If you launch your test URL in a browser and get the infamous AWS "AccessDenied" message, check your Alternate domain names in CloudFront and AWS Certificate Manager.
Pat yourself on the back If you got this far and have a working static website - it gets easier with practice. Unfortunately, you not done - many static websites rely on .htaccess for features such as default index page, error documents, rewrites, password protection, and directory listings. These will be covered in my next post on CloudFront functions.
Blog comments